
How to Add Custom Scripts and Styles

The video above shows only how to add CSS and javascript globally—to all or some of the site's pages—in the site configuration. It can often help to test code on a single page before adding it globally.
How to Add Custom Front-End Code to Brightspot
Add CSS or Javascript that applies to the whole site, a certain section, or a particular content type
- Open the admin menu and go to the Sites and Settings screen.
- Open the Front-End tab and scroll to the bottom of the page.
- If the Advanced section is not open, open it up and scroll down to see the advanced options.
- Go to the Custom Scripts and Styles input and click + Add Custom Head Elements.
- In the resulting panel, give your custom head element an Internal Name. It's most helpful to name it by where it applies (e.g. 'All Pages' or 'News Section').
- If you need to apply the element to only certain pages of your site, fill in the relevant fields in the Path Request Matcher section.
- HTTP Methods - Leave this blank.
- URL Pattern - If you want to limit this CSS or JS to a certain section of the site (as defined by a URL pattern), add a URL pattern following the instructions.
- Content Types - If you want to limit this CSS or JS to a certain content type, choose it here.
- Stop Processing? - This is not common. Leave it as is unless you have a particular need for it, and can test its application.
- Under Elements, click the + Add button.
- Choose the type of element you want to add. This means that whatever input you add in the following steps will be wrapped in that element.
- Style Element - <style> - for adding CSS
- Script Element - <script> - for adding javascript
- Add an Internal Name, usually something that describes the function of the code you're adding.
- Choose the location of the code you're adding.
- Inline - You'll type custom code into the text area. NOTE that you do not need to include the relevant style or script tag—just the code that you want inside that tag.
- Link - You want to include code that exists at a URL, such as a common library hosted at a public CDN.
- When you're finished adding code, click the Save button at the bottom of the page.
Add CSS or Javascript that applies only to a particular page
- In the Content section of the page, click + Add to add a new module.
- In the Add window, scroll to the bottom or click the Misc link at the bottom of the sidebar.
- Select Raw HTML Module.
- Open the HTML tab. Since content here is required, adding your CSS and JS here is easiest.
- Add the code you want to apply to the page (including the relevant style and/or script tag).
- View the effects of the code in the built-in preview or in a new window by clicking the preview button in the top right of the preview panel.
- When your code works as expected, click Publish or transfer it to a site setting as outlined above.
How to Create The Right CSS Code
Find Brightspot's CSS Classes
If there is a specific module or content type that you need to be modified for your page, you can use the Inspect Element feature that most browsers provide.
- Open your Browser's web inspector
- On Chrome and Edge, right-click the element whose code you want to view and choose Inspect Element.
- If you are running Firefox, click on three lines in the top right of your browser, select Web Developer, and then Inspector.
- Hover over portions of the code and watch the visual display. Each element should be highlighted visually when you hover over the HTML code that corresponds to it.
- In the HTML, you should be able to see
a - Click on an element's HTML code to view the CSS that already applies to it.
This will allow you to see what classes Brightspot has given the modules and the content within them, and you can modify them as needed.

Test CSS changes in your browser
The screenshots below show the interface from a Chromium browser (like Chrome, Safari, or Brave). Your interface may look different, but these panels or something similar will likely be there.
- Open the web inspector in your browser (described above).
- In the code inspector, click on the element you want to style. You should see a style editor panel that shows all of the existing CSS styles that apply to that element.

- If you want to change the value for any CSS rule, you can do that in the style editor and see the change reflected visually in the browser.
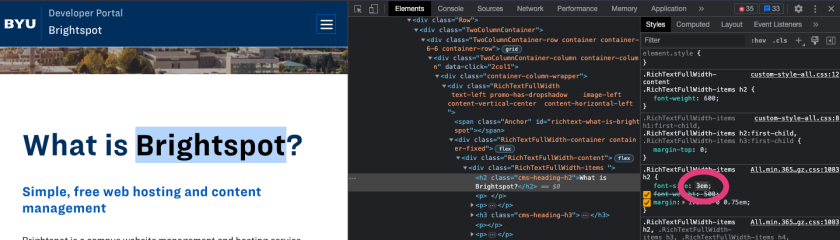
- If you want to add a new CSS rule, click the plus button at the top of the style panel. It will create a new CSS rule for the currently selected element. You can change the selector (before the brackets) and add CSS directives (inside the brackets).

- Once you've made the CSS modifications you want, copy the relevant CSS and paste it into a text document or code editor.

- Once you've finished and copied all your changes, follow the steps above to add the CSS to your page or website.