
The User Permission system in BYU Brightspot replaces the default Brightspot Users & Roles system, so managing users works differently here than what you might see in general Brightspot documentation. The BYU permissions system is detailed in this document.
Site Hierarchies
The site hierarchy system defines how the organization is structured. For example, here is a small hierarchy representing a subset of the BYU organization:
Terms
- Site Group: A grouping of sites. Has a parent which is another site group.
- Site: Site in the CMS. Has a parent which is a site group.
(G) -> Site Group (S) -> Site

(S) Life Sciences and (S) Biology are both sites. They are part of the (G) Life Sciences Sites group, which is part of the (G) BYU Sites group, which is part of the (G) All Sites group.
Similarly on the other side, (S) BYUH Home is a site. It is part of the (G) Hawaii Sites group, which is of course part of the (G) All Sites group.
Every site or site group can have at most ONE parent. A site or site group with NO parents implicitly has a parent of (G) All Sites.
How are these used? We can use these to manage users and assign permissions over multiple sites very easily.
For example, if you are an admin of the (G) Life Sciences Sites group, you are an admin of ALL sites below it.
You can apply permissions on a site by site basis or for any specific site group. This can be used to manage users by following the rule:
If you are a manager, you manage ALL users at your site hierarchy level and below.
For example, if you are an admin of the (G) Life Sciences Sites group, you can only manage users who are also associated with the group, or users associated with sites below ((S) Life Sciences or (S) Biology). You would NOT be able to modify or access users associated with (S) BYUH Home.
Add a New User
Someone Who Already Uses Brightspot
Each Brightspot administrator with access to the Users screen has access to administer user rights for every other person who has rights to edit the sites or site groups that the administrator has. For example, if I administer the Biology site group and have access to the User screen, I can see and edit only people who also have rights to edit any of the sites within that site group.
If you wish to grant rights to someone who already has rights somewhere in Brightspot—but not within your area—you won't be able to view their user profile in the Users page.
For example, an admin of the site (S) Life Sciences, can see users who have access to that site.
Another user, John, has rights to (S) Biology. The (S) Life Sciences site admin would like to give him rights to that site, but cannot see John's user account to give permissions.
There are two possible solutions to this problem:
- Reach out to a manager of the site group (G) Life Sciences Sites that contains both (S) Life Sciences and (S) Biology to give John the permissions needed, or
- Adopt John into the (S) Life Sciences site hierarchy.
To add permissions in your area to someone who has a Brightspot account but is not visible to you, use the following steps.
- Open the Adopt User screen (Admin > Adopt User)
- In the User dropdown, find the person you want to add.
- Set the permissions under Site Hierarchy and Role Publisher as detailed later.
- Click Save.

After saving, the permission set will be applied to the user's Brightspot profile, and then you will be able to manage his user and give him the permissions he needs.
Someone Who Has Never Used Brightspot
A user who has never used Brightspot before, or who does not yet have an account, will not be able to log in until an administrator creates their account. When creating the account, you must also grant the appropriate rights to the user.
To give rights to someone who has never signed in and does not yet have an account, use the New Tool User screen in the Users admin area.
- Enter their name in the Name field
- Enter their Net ID in the Email field and add @byu.edu. For example, if the Net ID were cosmo27, I would enter cosmo27@byu.edu in the Email field.
- Select the dropdown under Password and set it to Keep Same instead of Change.
- Select the Permissions tab and add the desired permissions.
- Click Save.
If you see an error that says you have a user with a duplicate email, you'll need to follow the steps for adding permissions to someone who already uses Brightspot.
Must be unique but duplicate at 00000177-d4e1-d374-a3ff-bffdd70e0000!
If you get an error message similar to the one seen above when creating a new user, this means that there is already an existing Brightspot account associated with the user's netID@byu.edu email address. To find the profile for the user, you can follow the below steps:
- Copy the unique ID from the error. In the provided error message, the ID number is 00000177-d4e1-d374-a3ff-bffdd70e0000. Note that this ID number does not include the final exclamation point.
- Try to find the person in the Admin -> Adopt User screen.
- If you still can't find them, paste the following URL into your address bar with the unique ID at the end: https://brightspot.byu.edu/cms/admin/users.jsp?id= .The full URL should look something like https://brightspot.byu.edu/cms/admin/users.jsp?id=00000177-d4e1-d374-a3ff-bffdd70e0000.
- Press Enter to navigate to the page. It should show the correct user account for the person you're looking for.
If you are still unable to locate the user profile, please contact websites@byu.edu for assistance.
Add To or Update a User's Permissions
Once you have found the user profile that you would like to edit, you can configure their account to access specific sites and hierarchies. This access needs to be moderated manually.
Find a user profile to edit
- Open the Brightspot admin menu (the three bars in the top left of any Brightspot editor screen).
- Open the Admin dropdown and click the Users item to open the user administration screen. If you do not see this option, contact your Brightspot administrator (who manages Brightspot sites for your department or college).
- Use the search field in the left sidebar to find the person you want to edit. If you do not find the person in your list—because they do not yet have rights to any sites you administer or do not already have a Brightspot account—follow the steps to add a new user.
- Click on the person's name (sometimes listed as netid@byu.edu) to edit their profile.
Add permissions for a site or site group
There are two ways to assign permissions to a user as shown within the permission set: Permissions or Roles.
Some definitions:
- Permission: An individual permission specifying one thing a user can do.
- Role: A business grouping of Permissions. Roles are beneficial because you can group together common permissions that are typically used together.
A permission set can have any number of permissions and/or roles.
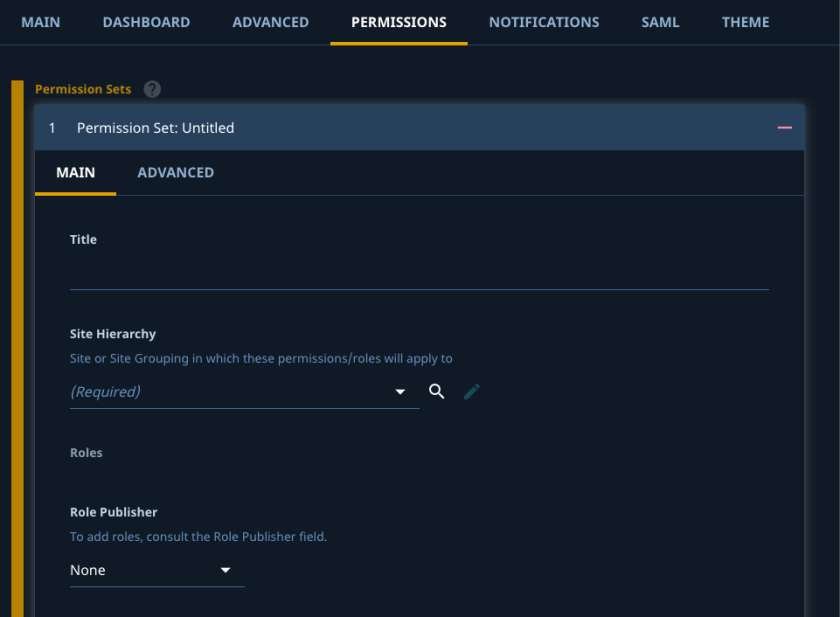
Let's go over the fields in a permission set.
- Title: An identifying value of this permission set (will default to the Site Hierarchy value).
- Site Hierarchy: REQUIRED. Defines which site hierarchy (site group or site) that roles and permissions will apply to.
- Roles: READ ONLY. A display of the current roles on this permission set.
- Role Publisher: The interface to add specific roles to a permission set.
- Permissions: READ ONLY. A display for the current permissions on this permission set
- Permission Publisher: The interface to add specific permissions to a permission set.
- Encompassing Section Restrictions: Limit the roles and permissions in this permission set to specific section(s) within a hierarchy.
The process is outlined in more detail below, but the general steps are these.
- Open the Permissions area.
- Choose a site or site group in Site Hierarchy.
- Add Roles with the Roles Publisher.
- Add more permission sets if needed.
- Click Save.
Note: You do not need to write anything in the permission set Name field. It will automatically be filled with the name of the site or site group once you've chosen that in the Site Hierarchy.
Open the Permissions area
In the Users screen, when you've found the person whose permissions you want to edit, go to the Permissions tab and click Add Permission Set. Or, if you're using the Adopt User form, the permissions fields will already be visible.

Choose a site or site group in Site Hierarchy
To specify what site or sites a person has access to, make a selection in the Site Hierarchy dropdown. You can choose either a site or a site group. Site groups are identified with the word Sites at the end of the name. In the images below, choosing Biology Department would give access to the main Biology department website. Choosing Biology - Department Sites would give access to all sites in the Biology department site group. Only one site or site group can be chosen here.
IMPORTANT: The sites listed in this menu are based on what you have access to in the selected site hierarchy!


Add Roles with the Roles Publisher
To specify what access someone has to the site or site group chosen above, use the Role Publisher. To add permissions, choose Add in the dropdown. This will reveal the Roles dropdown.

There may be several roles listed here, but the most commonly used are *Admin - Site and *Editor.
- *Admin - Site gives permission to edit content, site settings, and user permissions for a site. It includes rights to add, edit, and delete most common content types.
- *Editor gives permission only to edit content on a site. It includes rights to add, edit, and delete most common content types.

Other roles in the list can give additional access to admin screens (e.g. Admin - Developer) or content types (e.g. Content - Sports Types - All Actions), or they can be used in place of the site admin or editor roles to restrict access (e.g. Dashboard Only).
Add Permissions with the Permissions Publisher
Similar to the Role Publisher, we can select Add or Remove. There is one extra field in the Permission Publisher, which is the Filtered Type. This field only acts as a filter for the Permissions field below.
IMPORTANT: These permissions are filtered based on what you have access to in the selected site hierarchy!

Most of these permissions are automatically generated and don't need to be manually published, except for Type Permissions. If you would like to create and publish a type permission, please contact websites@byu.edu.
Encompassing Section Restrictions:
If a website is divided into sections, it is possible to regulate which sections a user has permission to make changes to. This is done by changing the dropdown from None to Set: and choosing the section(s) that the editor should have access to. This will only apply to the currently selected permission set. There is also a toggleable switch to allow the editor access to pages that are not in a section.

Saving Changes
After clicking Save, the Role Publisher and Permission Publisher will be set to None and the selected permissions will be added to the Permissions field.
You can assign as many permission sets as needed. Since a permission set only allows one entry in the Site Hierarchy, you'll need to add multiple permission sets to allow someone to edit more than one site or site group.
If you have a common set of sites you'd like to assign to people, you may want to put them all into a single site group. We have site groups for colleges, departments, and many other units. If you'd like to create a new site group, contact us at websites@byu.edu.
User Management
The final main aspect of the new permissions system is the ability to manage users. We will (again) utilize the site hierarchy system to determine which users you can manage and which ones you can't.
In the Users admin area, you can see which users you manage.

These are only going to be users that are at your management site hierarchy level or lower. You are defined as a "User manager" if you have access to the Users admin area.
For example (refer to our previous site hierarchy diagram):
- If you are a (S) Life Sciences manager, you will be able to see all users (including other managers) who have a permission set with the site hierarchy of (S) Life Sciences.
- If you are also a (S) Biology editor, you will NOT be able to see users who have a permission set with a site hierarchy of (S) Biology.
User Adoption
To grant Brightspot permissions to a user that is not within your site or hierarchy, you can use the Adopt User form. This form allows you to select any existing Brightspot user and apply a permission set to them. See the Add a New User documentation for specifics.
User Search
It can sometimes be beneficial to see who has what access to your page. This can be accomplished using the Advanced User Search as explained below.
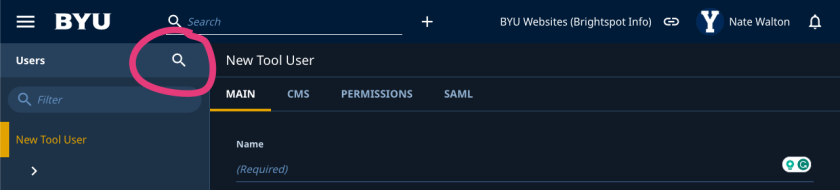
- Open the Brightspot admin menu (the three bars in the top left of any Brightspot editor screen).
- Open the Admin dropdown and click the Users item to open the user administration screen. If you do not see this option, contact your website administrator.
In the left sidebar, go to the Users title and click the magnifying glass. This will open the advanced user search page.
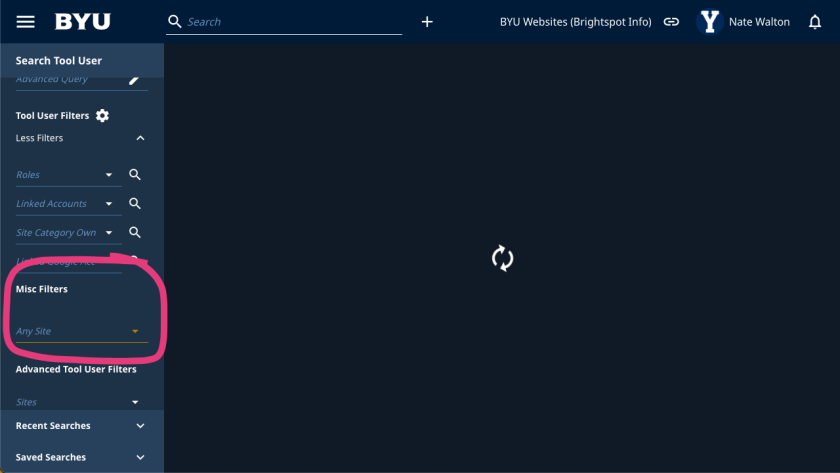
- Scroll the sidebar down to where you see the Misc Filters section.
Click on the dropdown that says Any Site to choose a specific site.
- If your site is not listed in the dropdown, you can type some or all of the name of your site, and all sites that match what you've typed will appear in the list.
- After you select the site you want and a checkmark appears next to it, click somewhere outside the box. This will close the dropdown and filter the list.
Modify or Remove Permissions
Now that you have a list of users with access to your site, you can update and remove their permission sets as needed.
NOTE: You may see some Brightspot administrators in your list. They will have permission sets that say 'BYU University Websites' or 'All Sites.' Avoid removing permissions from people who look like they may be administrators. If you have questions about the profile of any user that appears in this search, please contact websites@byu.edu for assistance.
- Locate the users whose permissions you want to modify or remove.
- Click on their Label or on the Edit Popup button to open their profile. (You can keep your place in the interface by using the Edit Popup.)
- Click on their Permissions tab.
- If you want to remove their access to your site, click the red minus button to the right of the permission set you wish to remove. (They may still have permissions for other sites that you do not control.) Otherwise, you can select the permission set and make changes as needed using the Role Publisher and Permission Publisher.
- Click the Save button.
- If you've used the Edit Popup button, click the Back link above the left sidebar. This will return you to your list of users.
SAML/GRO Provisioning
Permissions and roles can also be provisioned based on a user's net ID or a specific GRO group (referred to in Brightspot as a SAML group). This allows bulk provisioning of users and ensures that changes in GRO are also reflected in Brightspot. If you would like a new SAML provisioning group created, please contact websites@byu.edu.
A SAML Provision is a piece of content that defines a permission set to apply to users based on one or more Net IDs, one or more SAML group (GRO group), or both.
The SAML provisioning form is shown below. Note that this form is only accessible to the websites support team.

Fields:
- Net Ids: One or more net IDs to apply this permission set to
- Saml Groups: One or more SAML groups to apply this permission set to
- Permission Set: Standard permission set form.
This permission set will be applied to any user who matches ANY of the net IDs or SAML groups. If they already have a permission set with the selected site hierarchy, the new permission set (from the SAML provision) and the existing permission set will be merged together.
The permissions and roles applied via SAML provisioning within Brightspot will be tracked and constantly updated whenever the user logs in. If a SAML Provision was applied to a user, and that SAML provision was deleted/modified at some point, this WILL be reflected on the user the next time they log in.
Note that changes in GRO groups can take up to 24 hours to sync with external systems, thus if a user is given a GRO group outside of Brightspot, it may take a day for that change to be reflected within Brightspot.
Adding a GRO Group
If you would like a new GRO group added to Brightspot, contact websites@byu.edu for assistance.
Automatic User Archiving
Brightspot is set to automatically archive users who have not signed in within the past year. This means they will no longer have access to edit Brightspot sites. Another reason for a user being automatically archived is due to all of their permission sets being removed from their account.
Prevent a user's automatic expiration
If someone should not be archived, this setting can be overridden in the Overrides tab on a user's profile. To do this, set the dropdown under Overrides > Expiration - User > Days After Last Login Date to Auto Archive Users to None or to Change (enter a number of days before expiration) and click Save.
Restore a user's permissions
If a user has been archived, their permissions can be restored in the Users admin screen. Find the archived user's profile using the search field in the left sidebar. Click the user's name to open their profile. Click the Restore button in the top right of the screen. The user's permissions should be restored. If they have not signed in within the past year, they may be automatically archived again. To prevent this, they'll need to either sign in immediately or follow the instructions above to prevent this.
500 Error Upon Logging In
Sometimes, an editor or admin of Brightspot might receive a 500 error when logging into Brightspot. This is usually due to a permission set that's been archived. In other words, a website that the editor/admin has direct access to was archived. To resolve this error, simply go to the user's permissions tab in Brightspot and remove the archived website's permission set from the list. Click on each permission set to identify which website has been archived.