
A header, as defined, is information placed at the top (head) of a document or site. On this page, there are two kinds of headers that are set up. The first is the blue banner with the BYU logo, websites title, and search bar. The second is the navigation links "Home", "Documentation and Training", etc. This feature guide explains how to set up new or edit existing headers on a site.
Header Banner
The banner on each site is fairly standard across most BYU websites. The BYU logo must be included in the top left and a search bar is recommended on the right for easy navigation of the page. To access the header settings, click the hamburger menu in the top-left corner of Brightspot, open the Admin dropdown, and click on Sites & Settings. Navigate over to the Page Defaults tab and open the Header dropdown.
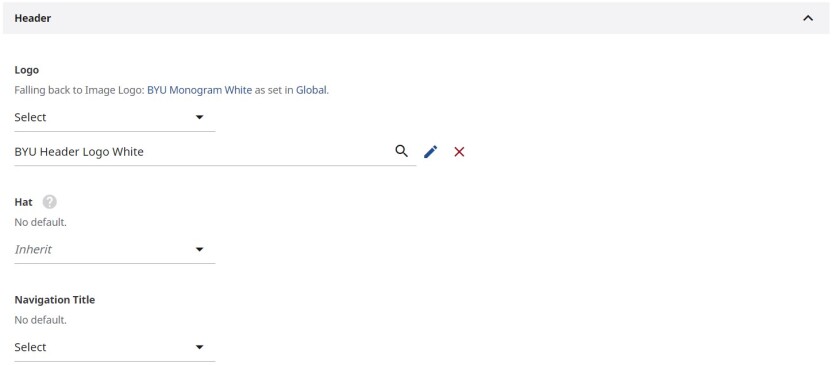
This page shows a few different sections, primarily the Logo section and the Navigation Title.
- Logo: Should be left as the BYU Header Logo (see the BYU Branding website for more information)
- Navigation Title: This is where a website title or logo can be added (such as Brightspot at the top of this page)
Editing the Navigation Title
There are three options when creating a navigation title: a Text Title, a Logo Title, or a Title Auto Generated by Section. After setting the navigation title, it is good practice to turn it into a link, generally to the site's homepage. The process for setting up each of these titles will vary slightly and is outlined below.
Text Title
A Text Title is a title that is typed in and automatically formatted. This title will be consistent across all pages in the website. To add it,
- Set the Navigation Title to Text Title
- Under Main Title, choose Set. A textbox will appear where the title is typed in.
- Go to the Link section, change it from None to either Internal or External, and add the page or type in the URL of the website it should point to.
Logo Title
A Logo Title is an image that is uploaded and added as the navigation title. This option is often chosen to stylize the title (instead of having it automatically formatted by the Text Title option). To add it,
- Set the Navigation Title to Logo Title
- Click on the magnifying glass to choose the logo from the window that opens up. If the logo is not already uploaded, click New image logo in the bottom-right corner of the window to upload it.
- Clicking the Logo will automatically take the user back to the website's homepage. To change this, click the pencil icon to the right of the image name, scroll down to the bottom of the logo's content page and change the link section from None to either Internal or External.
Title Auto Generated by Section
This option will allow the navigation title to change depending on the section of the website the user is in (see the Sections feature guide for more information). To use this option,
- Set the Navigation Title to Title Auto Generated by Section.
- Under Main Site Title, switch it from None to Set and add a default Text Title for pages that are not in a section (such as a homepage). The main site title will also appear above section titles.
- Go to the Link section and turn the Main Site Title into an internal or external. The section title will automatically redirect users to the section page.
When adding the links, there are two options, Internal Links and External Links. And internal link can point to another Brightspot page and loads faster than an external link, so it is better to use it when possible. An external link can point to any webpage from the internet by pasting in the URL.
Breadcrumbs

Breadcrumbs appear right above the Navigation Title and are often use to link a website back to a parent site, such as a department homepage. Breadcrumbs can be added above text titles or titles that are automatically generated by section (they cannot be added above a Logo title) An example of this is the Developer Portal breadcrumb in all header banners throughout sites.byu.edu. To add a breadcrumb,
- Open Sites and Settings and navigate to the Page Defaults tab
- Open the Header dropdown
- In the Navigation Title section, scroll down to the Breadcrumbs subsection
- Click + Add Navigation Link
- Under Text, add the title of the breadcrumb (that will appear for the user)
- Set the link to Internal or External and add the page that the breadcrumb will link to
- Save the changes
Header Subtitle

A subtitle can be added underneath the navigation title but only if a text title is being used (not available with logo titles or titles automatically generated by section). It will show across all pages in the website and cannot link to other pages. To add a subtitle,
- Open Sites and Settings and navigate to the Page Defaults tab
- Open the Header dropdown
- In the Navigation Title section, scroll down to the Subtitle subsection
- Type in the desired subtitle
- Save the changes
Navigational Header
(To see a video on this visit the Edit Header Navigation tutorial)
Page Navigation content is used to define the links in the header navigation bar and in the footer. Each Page Navigation item has a title and a list of links. These links aren't automatically updated in any way (like when a page or a section is created). A site editor specifies exactly which links appear in the navigation.
Update existing header navigation
- Use the search field at the top of the editor page to search for the header navigation.
- If the page navigation does not appear with a text search, change the filter in the left sidebar from All Content Types to Page Navigation
- Click on the Page Navigation, and the edit page will open.
- Edit the Items. These are the links that appear in the navigation bar.
- Click Publish.
To add link to navigation
- Click the + Add below the existing Items.
- Choose Simple Navigation Item in the dropdown.
- Make sure that the navigation item type is set to Navigation Link.
- In the module that opens, scroll down to the Link heading, then to the Item heading below that.
- Click the space that says Required or the magnifying glass to open a search window (or switch the link to External, paste the link to the page, and skip to step 6).
- Choose the page or other content this navigation item should link to.
- If needed, edit the Text to change the title that appears.
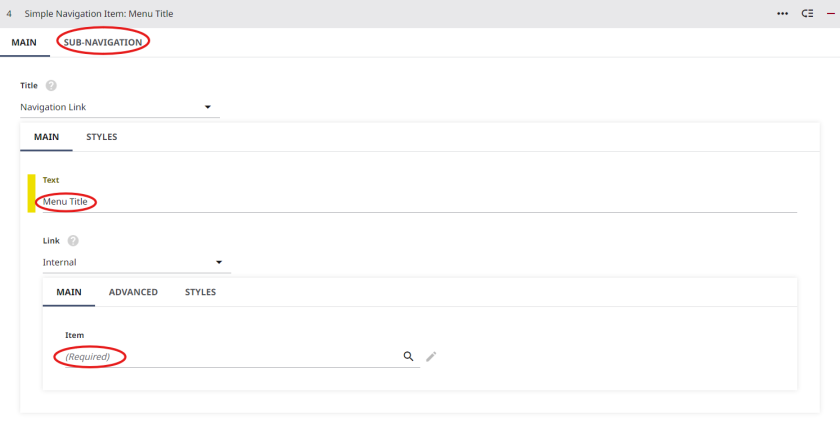
To add dropdown to navigation
- Click the + Add below the existing Items (or click on an existing module and skip to step 5)
- Choose Simple Navigation Item in the dropdown
- In the module that opens, click the dropdown under Title and select Navigation Text
- In the space underneath Text, type in a title for the dropdown
- Go to the Sub-Navigation tab
- Click Add and choose Navigation Link
- Click the space that says Required (under Link) or the magnifying glass to open a search window
- Choose the page or other content this navigation item should link to
- Alternatively, change it to an External link and paste the URL to take the user to a page outside of Brightspot
- If needed, edit the Text
To remove an item from navigation
- Click the red minus button (—) to the right of an item to remove it.
- A pink background will appear on the item and its text will disappear, indicating that it has been removed. The item will be completely removed as soon as the page is published.
- To undo removing the item, click the plus button (+) that has appeared in place of the minus button, and the item will be restored.
Adding the Header Navigation
1. Go to the Page Defaults tab in Sites and Settings.
2. In Page Defaults, open the Header dropdown and scroll down to the Navigation subheading.
3. In the first dropdown menu, make sure that select is chosen. After which, in the second dropdown menu, select the header navigation that should be set as default for the site.
4. Click on Save at the bottom.
Custom Header
A custom header can also be added for a specific page or section of the site through the overrides tab:
1. Go to the page that needs the customized header
2. At the top menu, select Overrides
3. Scroll down to Header and then Navigation
4. Select the customized Page Navigation item
Q&A
-
Toggle ItemWhy is the header on one or a few of my webpages different from the rest of my website?
That's probably because those webpages have overrides set up separately. Overrides set up on a webpage allow the webpage to behave differently from what has been set up in Sites & Settings —> Page Defaults. To check if a webpage has overrides set up, follow the steps underneath the "Customer Header" section above.